Pages

Thursday, March 9, 2017

Change the Language of SharePoint List Template

Problem Background

Recently I had to save a list as “List Template” from my client’s SharePoint Online site (which the language is configured to French) and upload to my SharePoint site (the language is English) and create a list using that particular List Template.

However, the list template was not displayed when I try to create a new list by navigating to “Add an App”. This is because of the language is not the same.

Solution

So, what I did was to change the language of the list template.

Step 1

Download the List Template from SharePoint List Template Gallery. The extension of the list template file would be “.stp”.

Step 2

Change the extension from “.stp” to “.cab” as given blow.

image 

Step 3

Extract the file and you will be getting a “manifest.xml” file

image

Step 4

Open the .xml file a note page and change the language to your desired language number and save it.

image

You can get the language ID list from the below url.

https://technet.microsoft.com/en-us/library/ff463597.aspx

Step 5

Open PowerShell and navigate to the folder where your manifest.xml is located and run the below script.

  
 makecab manifest.xml [Name of the list template].stp

My one looks as below.

image

Hit Enter and your List Template will be created.

image

Conclusion

Now your list template is created with new Language. You can upload to List Template Gallery and you can start creating the list.

image

image

Wednesday, March 1, 2017

Basic operations in Host Web from Add-in Web using PnP JavaScript Core Library

Introduction

My my previous blogposts I discussed on

  1. Use sp-pnp-js with SharePoint hosted Add-in
  2. Communicate with Host Web from Add-in Web through PnP JavaScript Core Library

This post will be a continue of the above two posts. In this post we will be addressing the basic operations on SharePoint list items.

Permission

In order to do operations on the list on host web we need to give permission to the List. In our case we have to set the permission “Scope” to “List” and “Permission” as “Manage”. Please refer the image below.

Click on AppManifest.xml –> Permission

Set “Scope” to “List” and “Permission” to “Manage”

image_thumb[1]

The addinWeb will be the Add-in web url and the hostWeb will be the Host Web url. You may download the solution from the link given at the bottom and refer for more.


Add new Item to List

  
    $pnp.sp.crossDomainWeb(addinWeb, hostWeb).lists.getByTitle("List1").items.add({
        Title: "Title"
    }).then(function (result) {
        alert("Item Added");
        //"result" will return couple of properties of newly created item. We can make use of them here
        console.log(result.data);
        console.log(result.data.Id);
    }).catch(function (err) {
        alert(err);
    });


Update existing Item

  
    //Get the item By Id and call the update
    $pnp.sp.crossDomainWeb(addinWeb, hostWeb).lists.getByTitle("List1").items.getById(2).update({
        Title: "Title Update"
    }).then(function (result) {
        alert("Item Updated");
        $("#message").html("Item Updated");
        //"result" will return couple of properties of updated item.
        console.log(result.data);
        console.log(result.data.Id);
    }).catch(function (err) {
        alert(err);
    });


Delete a exiting Item

  
 //Get the item By Id and call delete
    $pnp.sp.crossDomainWeb(addinWeb, hostWeb).lists.getByTitle("List1").items.getById(2).delete().then(function (result) {
        alert("Item Deleted");
        $("#message").html("Item Updated");
    }).catch(function (err) {
        alert(err);
    });

Using the above code snippet you can do the basic operations.

Conclusion

Hit F5 and you will prompt to Trust and select the List you want  give the permission to.

Select the List name from the dropdown and Click on “Trust”.


image_thumb[3]

You can download the code from the below.

https://drive.google.com/file/d/0ByEnOE8DAdvhSUhHWEJuTzBTUm8/view?usp=sharing

Reference

https://github.com/SharePoint/PnP-JS-Core/wiki/Working-With:-Items


Thursday, February 23, 2017

Communicate with Host Web from App Web through PnP JavaScript Core Library

Introduction

Yesterday I had blogged on “How to use PnP JavaScript Core Library with SharePoint Hosted Add-in”, as a continue for the above post; today we will discuss on “How to communicate with Host Web from App Web through PnP JavaScript Core Library”.

Solution

As a example for this blogpost we will list down all the lists which are available in Host web.

Download the sample from my previous post and replace the below code in App.js file.


'use strict';

//Get the QueryString data from the url
function getUrlParamByName(name) {
    name = name.replace(/[\[]/, "\\[").replace(/[\]]/, "\\]");
    var regex = new RegExp("[\\?&]" + name + "=([^&#]*)");
    var results = regex.exec(location.search);
    return results === null ? "" : decodeURIComponent(results[1].replace(/\+/g, " "));
}

function myPnP() {
    var addinWeb = getUrlParamByName("SPAppWebUrl");
    var hostWeb = getUrlParamByName("SPHostUrl");

    //This will read Lists from the host web
    $pnp.sp.crossDomainWeb(addinWeb, hostWeb).expand("Lists").get().then(function (result) {
        var resulttring = "";
        for (var i = 0; i < result.Lists.length; i++) {
            resulttring += "List Name: " + result.Lists[i].Title + "
List ID:" + result.Lists[i].Id + "
List Description:" + result.Lists[i].Description + "

"; } document.getElementById("message").innerHTML = resulttring; }).catch(function (err) { alert(err); }); } //Call the above function after the page load document.addEventListener('DOMContentLoaded', function () { myPnP(); });

Conclusion

When you run the project by hitting F5, the list name, list id and the list description will be displayed as below.

image

You can expect more blogposts since myself and my team is working on a large SharePoint hosted Add-in using PnP JavaScript Core Library.

You may download this sample from the below url.

https://drive.google.com/file/d/0ByEnOE8DAdvhZ3pveFRtSWFzUEk/view?usp=sharing

Wednesday, February 22, 2017

Use sp-pnp-js with SharePoint hosted Add-in

Introduction

My team is assigned to deliver couple of SharePoint hosted add-ins using Patterns and Practices JavaScript core library.

This blog post will be the starting and hopefully some more will follow.

PnP JavaScript Core Library

The Patterns and Practices JavaScript Core Library is a JavaScript Library which was created to help developers by simplifying common operations within SharePoint and the SharePoint Framework.

This library provides a fluent API to make building your REST queries intuitive and supports batching and caching. You can learn more on the project's homepage which has links to documentation, samples, and other resources to help you get started.

(http://dev.office.com)

Create a solution with SharePoint Hosted Add-in template in Visual Studio

image

Remove unwanted files and references

Remove sp.js

The sp.js is the library used for JavaScript Object model. This file contains the extension methods to communicate with SharePoint. Since we are going to communicate with SharePoint using pnp.js we will remove it from the Page.

Go to Default.aspx page and just delete the line which is shown below.

image

Add needed JavaScript Libraries

You have to add the below JavaScript libraries into Scripts Module.
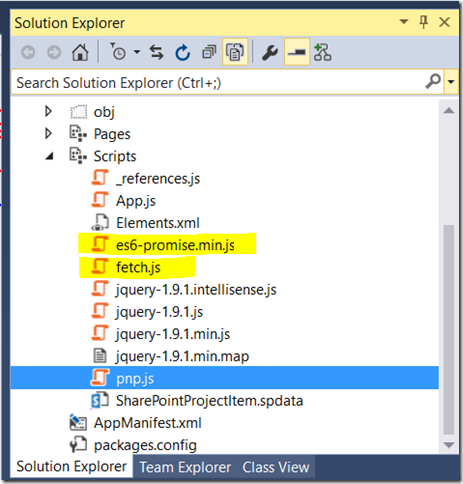
image 

es6-promise.js  and fetch.js libraries are needed in order to the add-in work in Internet Explorer. It is because, PnP core library implements fetch and promises, which are not supported on Internet Explorer Browser. To overcome this issue, we need to add these libraries.

The libraries should be referred in the page as in the above order.

image

<script type="text/javascript"  src="../Scripts/es6-promise.min.js"></script>
     <script type="text/javascript" src="../Scripts/fetch.js"></script>
     <script type="text/javascript" src="../Scripts/pnp.js"></script>
     <script type="text/javascript" src="../Scripts/App.js"></script>

Now you are ready to query SharePoint environment using PnP Library.

Remove all the code from App.js file and the below sample code which will display the App Web Title and the url.


'use strict';

function myPnP() {
    //Retrieve Web Title and other details the current web
   

    $pnp.sp.web.select("Title", "Url", "Description").get().then(function (data) {
        var details = "";
        
        details += "Web Title : " + data.Title;
        details += "
Web URL : " + data.Url; details += "
Description : " + data.Description; document.getElementById("message").innerHTML = details; }).catch(function (err) { alert(err); }); } //Call the PnP method after the page load document.addEventListener('DOMContentLoaded', function () { myPnP(); });

Hit F5 and your solution will be deployed.

Conclusion

You can start working on SharePoint hosted add-in using PnP JavaScript Core Library.

Please download the solution from the link below.

https://drive.google.com/open?id=0ByEnOE8DAdvhbDRGcWdGS2hsQk0

Link a column of a list other than the title to DispForm.aspx in SharePoint 2013

Problem

I had created a custom SharePoint list through Visual Studio 2013. I had added another column. I need this column to be linked to display form of the item. By default title field is linked to display form.

Solution

The solution is simple

  1. Open the Schema.xml of Listimage
  2. Search for your field under <Fields> tag.
  3. Add LinkToItem="TRUE" as a property.

image

Conclusion

Now you can click on your field and navigate to the display form.

Here is the visual studio solution:

https://drive.google.com/file/d/0ByEnOE8DAdvhdV80Y3ZCQzh0TkE/view?usp=sharing

Tuesday, February 14, 2017

Upgrade process of SharePoint Hosted Add-in

After developing a SharePoint hosted Add-in, we can publish them in Office store or tenant app catalog. When the add-ins are published in Office store and app catalog sites, they track add-in’s version numbers. When an add-in is installed, the version number is recorded for the particular add-in instance.

For an example, let’s say we have published a SharePoint hosted add-in with the version number 1.0.0.0. Now you have to upgrade the add-in after some modification.

For that, you can just increase the version number in AppManifest.xml in the solution.

image

Then you have to publish the add-in to the office store or app catalog site again. In App catalog you just have to replace the package.

Then in Site Content page a message will show as “An update for this add-in is available” near the add-in name, as shown below.

image

According to Microsoft, it will take maximum of 24 hours to appear in Site Content page. My one also took around 24 hours to display, the message.

Then click on “update” and click on “GET IT” button. Also you have trust it.

Note, that the Update for the add-in is not forced. You can update the add-in only if you wish to.

Friday, February 10, 2017

Check whether a user exists in a SharePoint group using Rest Api?

Solution

The rest query url. This was tested in SharePoint Online

var isMember = false;

var userId = _spPageContextInfo.userId;// _spPageContextInfo.userId is current logged in user

var groupName = "Name of the group";

var url = _spPageContextInfo.webAbsoluteUrl + "/_api/web/sitegroups/getByName('"+ groupName +"')/Users?$filter=Id eq "+ userId ;
Once the results are received we have check the length of the results as below.

if(result.data.d.results.length >0){
                 isMember = true;
                 }
     

The full code is below. Please note that I have used deferred in Angular JS.

  function getIsCurrentUserInGroup()
    {
        var isMember = false;
 var deferred = $q.defer();
 var userId = _spPageContextInfo.userId;// _spPageContextInfo.userId is current logged in user
 var groupName = "Name of the group";
        var url = _spPageContextInfo.webAbsoluteUrl + "/_api/web/sitegroups/getByName('"+ groupName +"')/Users?$filter=Id eq "+ userId ;
        $http({
            url: url,
            method: "GET",
            contentType: "application/json;odata=verbose",
            headers: { "Accept": "application/json; odata=verbose" }
        }).then(function (result) {
            
           if(result.data.d.results.length >0)
 {
  isMember = true;
 }
            deferred.resolve(isMember );
        }, function (error) {
            deferred.reject('Request failed. ' + errorCode.get_message() + '\n' + errorCode.get_stackTrace());
        });

        return deferred.promise;
        
     }